Tap and Drill Charts
-
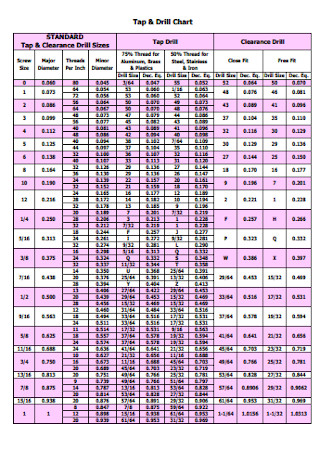
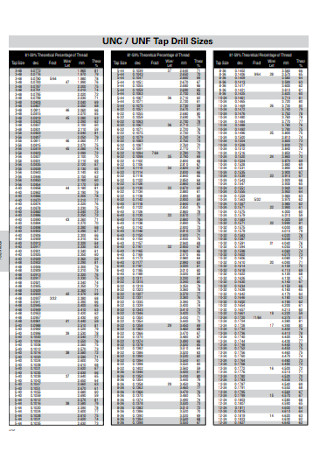
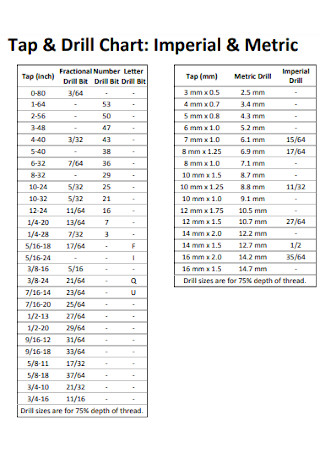
Sample Tap and Drill Chart
download now -
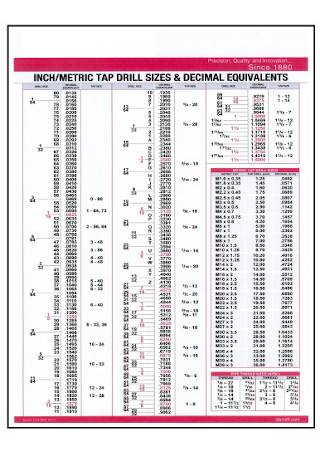
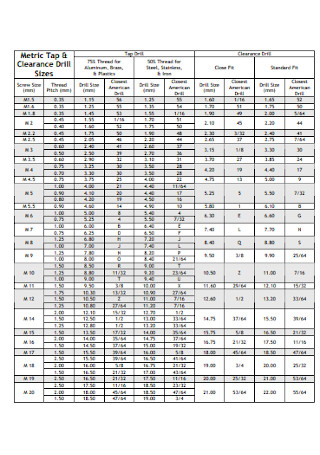
Metric Tap and Drill Chart
download now -

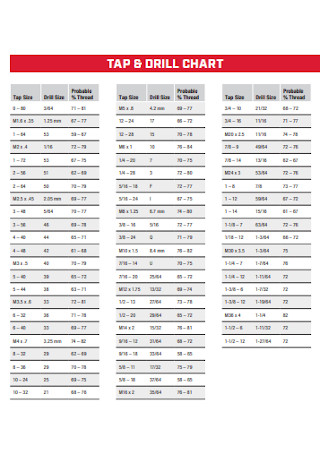
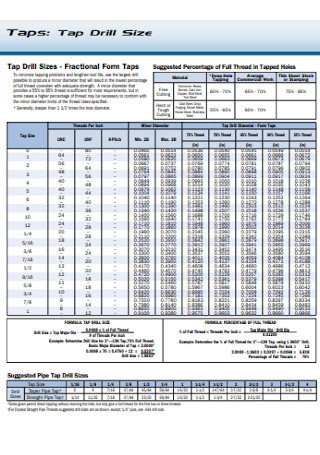
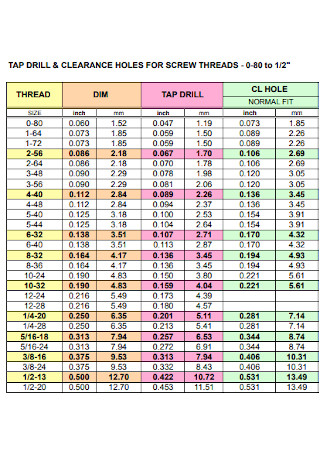
Tap and Drill Size Chart
download now -
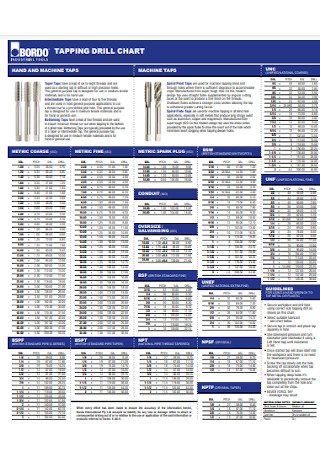
Tapping Drill Chart
download now -
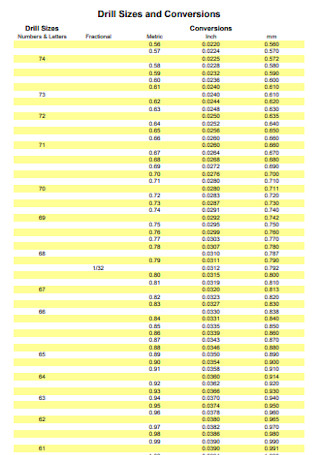
Drill Sizes and Conversions Chart
download now -
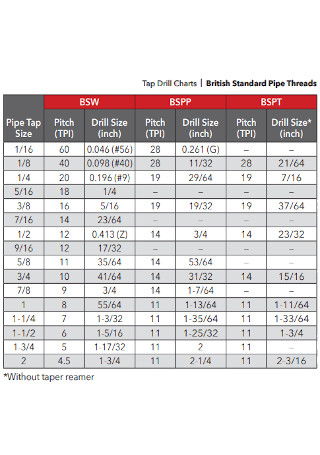
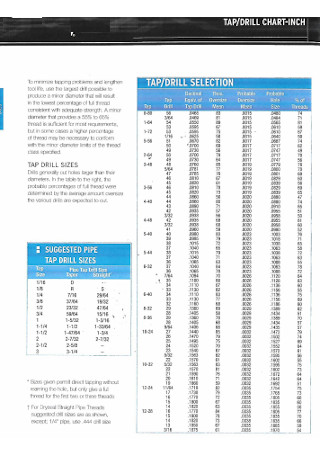
Tap Drill Pipe Chart
download now -
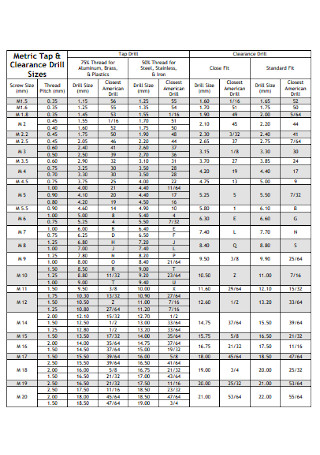
Metric Tap Clearance Drill Chart
download now -
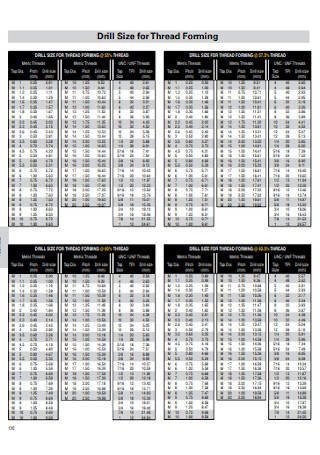
Drill Size for Thread Forming Chart
download now -
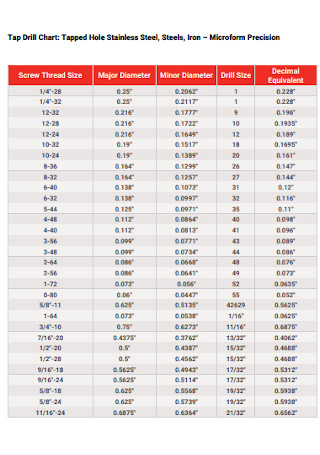
Steel Tap Drill Chart
download now -
Sample Tap Drill Chart
download now -
Basic Tap and Drill Chart
download now -
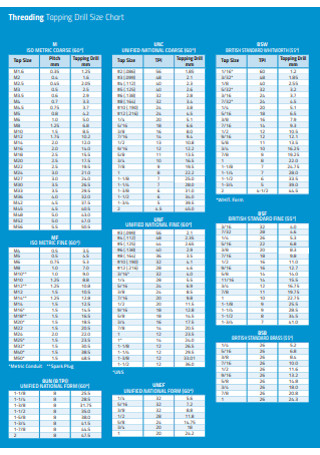
Threading Tapping Drill Size Chart
download now -
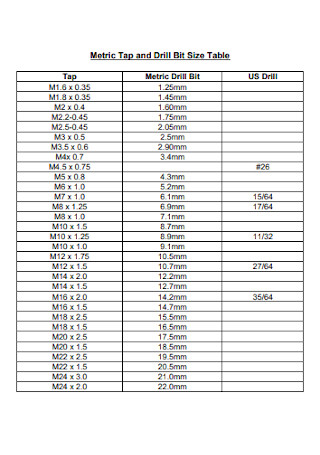
Metric Drill and Tap Chart
download now -
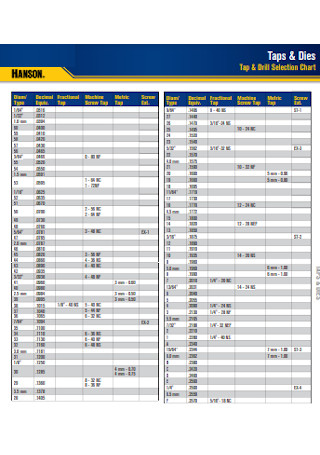
Tap and Drill Selection Chart
download now -
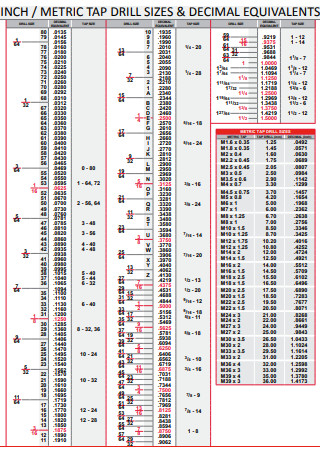
Tap Drill Inch Chart
download now -
Formal Tap Drill Chart
download now -

Tap and Drill Percentage Chart
download now -
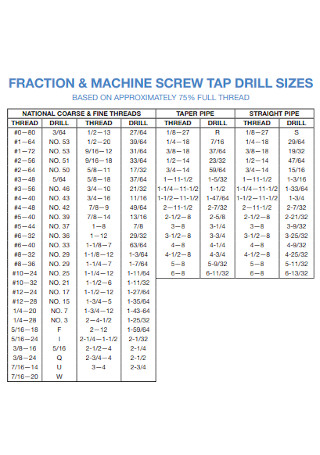
Machine Screw Tap Drill Chart
download now -
Tap Drill Clearance Chart
download now -
Tap Clearance Drill Chart
download now -
Tap and Drill Bit Size Chart
download now -
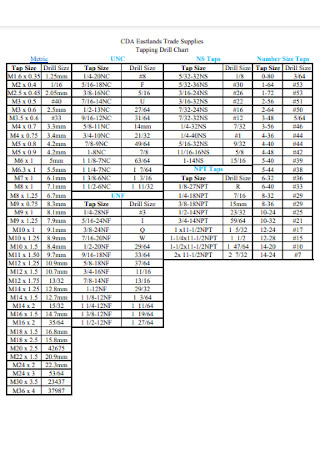
Trade Supplies Tapping Drill Chart
download now -
Imperial Tap and Drill Chart
download now -
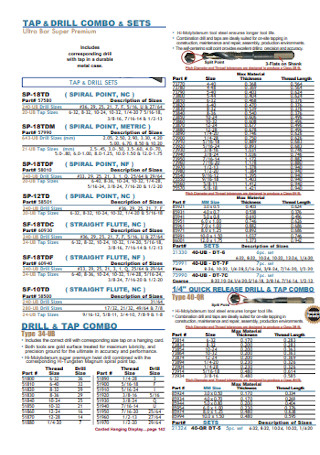
Tap Drill Combo Chart
download now -
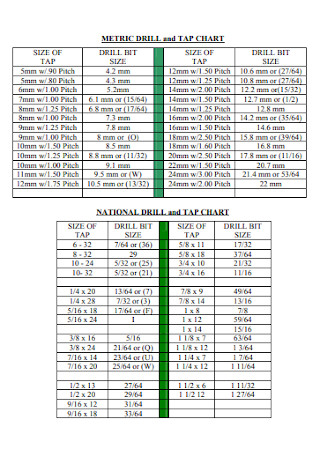
National Drill and Tap Chart
download now -

Imperial Tap Drill Chart
download now -
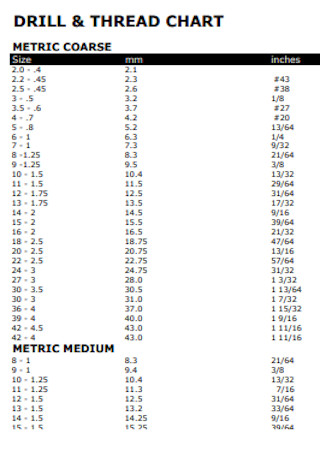
Drill and Thread Chart
download now -
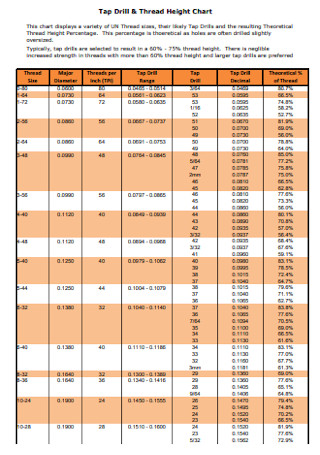
Tap Drill and Thread Height Chart
download now -
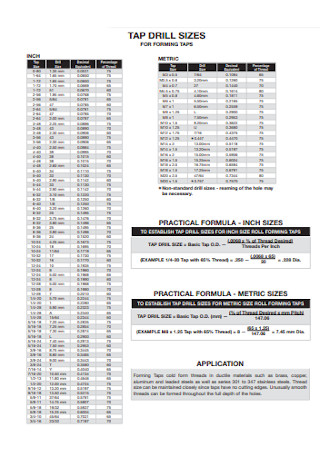
Drill for Forming Tap Chart
download now -
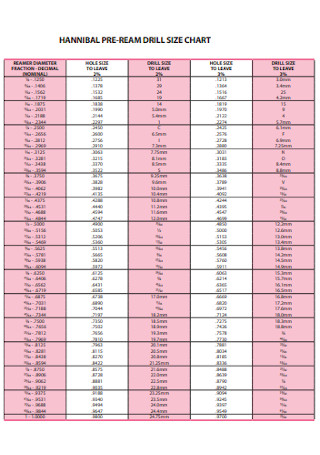
Pre-Ream Drill Chart
download now -

Tap Drill Reference Chart
download now -
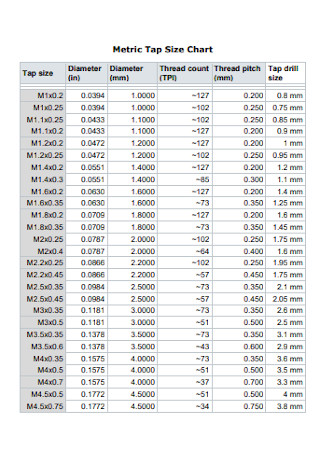
Sample Metric Tap Size Chart
download now -
Tap Drill Chart Format
download now
FREE Tap and Drill Chart s to Download
Tap and Drill Charts
What Is Tap and Drill Charts?
What Are the Things to Consider in Converting Drill Bit Sizes?
Usage of Tap and Drill Chart
How to Read a Tap and Drill Chart?
Elements of a Tap and Drill Chart
How to Use the Tap and Drill Chart
FAQs
Do You Need a Drill Chart for a Tap Drill?
What Does M Mean on a Tap Drill Chart?
How Does the Tap and Die Chart Work?
What Is Tap and Drill Charts?
A drill and tap chart is what indicates the exact size of the drill bit that can be used to generate the correct sized opening that would complement tap dimensions. A drill and tap chart can be found here. When it comes to matching pairs of female and male threads that are tightly secure together, a tap drill chart is essential for success. When purchasing either dies or taps, it is common to see the respective dies and taps in the same package. Nonetheless, only the sizes of the drills are determined by this particular drill chart. Making female screw threads necessitates the use of a tap. The die is necessary to create a male screw thread and contains a small split on one side that allows for adjustment of the screw, as well as the ability to be slightly altered for varying degrees of sharpness and different materials, among other features. Other chart templates are available on our website, and you can use them whenever you need them. They are as follows: drill bit charts, pipe tap drill chart, Starrett drill, and tap chart, thread tap drill, drill speed charts, tap and die drill size chart, NPT tap drill chart, roll form tap drill chart, wall tap drill size chart, number drill size chart, gunsmith tap, and drill chart, and other similar proposal template are available. This post will not only provide you with templates but will also provide you with important information that you need to know in order to complete your template.
What Are the Things to Consider in Converting Drill Bit Sizes?
First and foremost, you must examine the tap drill chat to ensure that the correct drill bit size has been confirmed. Fortunately, these charts are readily available on the internet. When you have the correct tap chart, you will require taps for the pieces that will be manufactured. A hole and thread will be drilled into the material in order to create a female screw shape. Because there are numerous methods for creating holes, the most commonly advised method is to use a tap.
Standard taps are available in one or more drill bit sizes. It is common for the bit size(s) to be larger than the thinnest section of the male screw. If you want to get the correct drill and tap size, you must first determine if the screw you require is coarse or fine in size. You can simply establish the correct drill bit size if you have this type of information. Additionally, the taps are capable of creating holes with varying depths ranging from 50 to 100 percent of the size of the hole.
Usage of Tap and Drill Chart
In most cases, you will be unable to determine the size of the tap drill to use for your screw or bolds unless you have access to an accurate tap drill chart. A tap drill chart will be of assistance to you in the following ways:
1. Identify the Appropriate Size
Because the sizes and materials of the different types of taps and drills vary, the charts will assist you in determining the suitable size for your drilling project based on your needs.
2. Diameter in Inches Is Compared to the Diameter in Millimeters
Tap drill charts assist machinists in comparing the size of a drill bit in order to select the sort of drill bit that will produce the proper size hole. Having chosen which drill bit is most appropriate, the mechanists then continue to drill the hole to the desired length. After that, taps are inserted to create guides of the appropriate size. It is important to note that it is the proper use of taps and charts that results in accurate guides. The following is an example of how you can utilize these charts to make your instructions to the best of your ability:
- In order to begin, you must first create a hole within the material.
- Repeat the drilling process while generating threads inside the hole, using your tap and charts to ensure the correct size.
- Tighten the tap by placing the square of the tap over the holder.
- Placing the tip of the tap into the hole in a perpendicular direction and gently pressing it inside will result in a smoother flow of water.
- Allow the tap to cut threads in the wall of the hole until it reaches two revolutions of the thread cutter.
- Turn the tap counter-clockwise, preferably three to four times. This will aid in the loosening of the chip.
How to Read a Tap and Drill Chart?
The tap and die chart shows which taps and dies correlate to which drill sizes and diameters. Simply matching the size of the drill with the appropriate features, such as thread count for every inch and the material type of the drill, is all that is required to read it accurately. Taps are used to cut internal threads in a variety of applications. They are available in four of the most typical configurations:
- Taper tap
- Bottoming tap
- Taper tap
- Plug taps
- Machine screw taps
Elements of a Tap and Drill Chart
More often than not, you will find that the tap and die chart corresponds to a specific drill size and diameter in a similar way. As a mechanist, all you have to do is read the chart in order to find a matching component. The match should have the proper drilling qualities, such as thread count, in order to be effective. Aside from that, one must be familiar with the different types of taps in order to comprehend the chart. In general, there are several different types of taps available on the market. Depending on your needs, below are some of the most frequently encountered:
How to Use the Tap and Drill Chart
Installation and manufacturing professionals use the drill and tap chart to determine which taps and drill sizes to use in conjunction with which taps and drill sizes to use in conjunction with which results in female screw guides. Working in a timely manner allows workers and homeowners to finish predrilled things by assembling components that were not previously assembled. In order to figure out which drill bit makes the appropriate hole size, drill and tap charts rely on the size of a drill bit in the chart being compared to one another. Following that, manufacturers will drill a hole of the appropriate length, insert the tap, and begin manufacturing the guides. When they twist the taps, it carves out guides that are the proper size for the job. It also guarantees that the treads of screws have a snug fit. Drill charts are a great tool for working with wood and metal components. The guides are constructed by the proper application of taps and charts for both wood screws and machine screws.
1. Drill the Hole of the Right Length
In order to create a new thread inside a hole, it is necessary to first re-drill the previous hole. Look at the tap and drill chart to determine the proper size, and then begin drilling. After that, tighten the tap by positioning the square of the tap on top of the holder.
2. Put the Tap
After that, insert the tip of the tap into the hole, making sure that the tap is positioned in a perpendicular direction to the hole’s direction of rotation. After that, you must press down on the tap and turn it within the hole. The tap then cuts the thread in the wall of the hole with its cutting edge. When you have completed at least two complete revolutions, turn the tap backward around half or three-fourths of a turn; at first, you may require three turns rather than two. This aids in freeing the chip from its socket.
3. Start Making Guides
In the event that you operate with dies, you should be aware that they are used in the same manner. The main difference between them and drilled holes is that they are applied to a round rod rather than a drilled hole. The size of the die that you choose must be the same as the size of the rod that you are using. For example, if you want a rod that is 3/8″ in diameter, your die must have the same diameter.
Taper taps are used to cut threads that travel through a hole in a piece of metal or plastic. Plug taps are designed to function on threads that only partially pass through a hole. Machine screw taps are the tiniest taps you will find, and they are designed for holes with small diameters. By referring to the chart, you will be able to quickly determine the size of the hole that you need to drill. Using bottoming taps is quite useful when you need threads to go all the way through to the bottom.
FAQs
Do You Need a Drill Chart for a Tap Drill?
They are quite useful in determining the optimal size of the tap drill in order to ensure that the entire procedure can be completed without any issues. It is necessary in order to create female screw threads. All standard size taps are delivered with a minimum of one drill bit size that corresponds to the size of the tap itself.
What Does M Mean on a Tap Drill Chart?
As shown in the tap drill chart, the “M” signifies that the thread has a “metric diameter,” which in this case is 4 millimeters. The second value (0.7) represents the pitch, which is the space between two adjacent threads measured in millimeters between them.
How Does the Tap and Die Chart Work?
The tap and die chart shows which taps and dies correlate to which drill sizes and diameters. Simply matching the size of the drill with the appropriate features, such as thread count for every inch and the material type of the drill, is all that is required to read it accurately. Taps are used to cut internal threads in a variety of applications.
Among the charts you will find are Imperial Charts, which allow users to compare dimensions in inches rather than millimeters. It serves the same purpose as before, but it is absolutely necessary if you are dealing with guides that cover drill bits larger than an inch in diameter. Keep in mind that depth varies from chart to chart, which means metalworkers should be aware of the depth they require so that they can use only one chart for all of their guides. Here is a straightforward method of employing them.