10+ Sample Foot Reflexology Charts
-
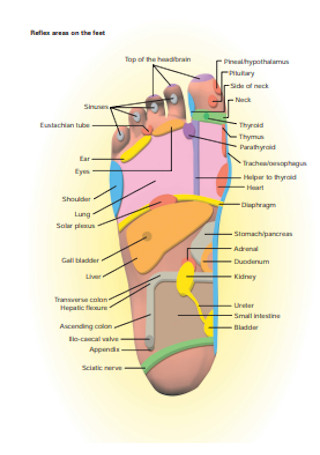
Reflex Areas on the Feet Chart
download now -
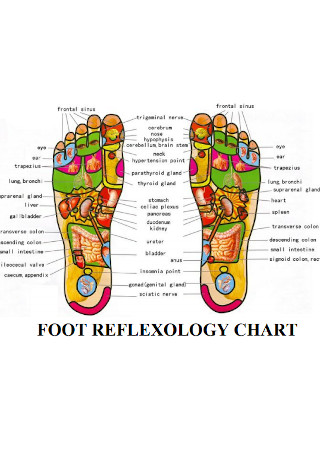
Basic Foot Reflexology Chart
download now -
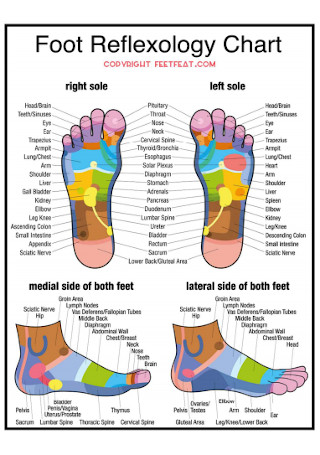
Foot Sole Reflexology Chart
download now -
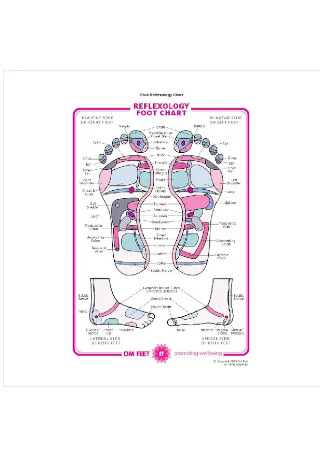
Foot Reflexology Chart
download now -

Simple Foot Reflexology Chart
download now -
Foot Reflexology Association Chart
download now -
Foot Reflexology Chart Format
download now -
Foot Reflexology Chart Template
download now -
Standard Reflexology Foot Chart
download now -
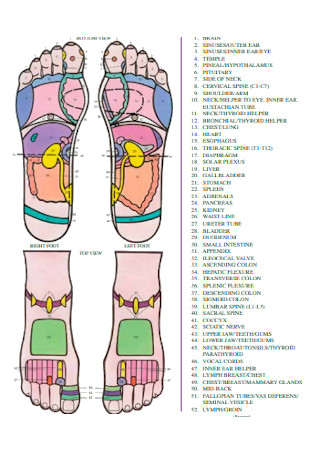
Foot Reflexology Chart Example
download now -
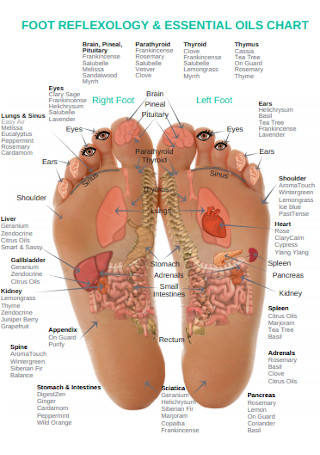
Foot Reflexology Essential Chart
download now
FREE Foot Reflexology Chart s to Download
10+ Sample Foot Reflexology Charts
What Is a Foot Reflexology Chart?
What Are the Common Benefits of Foot Reflexology?
The Four Basic Areas of a Foot Reflexology Chart
How to Make a Foot Reflexology Chart
FAQs
What are the two kinds of foot reflexology charts?
Are reflexology and a massage the same thing?
What is another name for reflexology?
What Is a Foot Reflexology Chart?
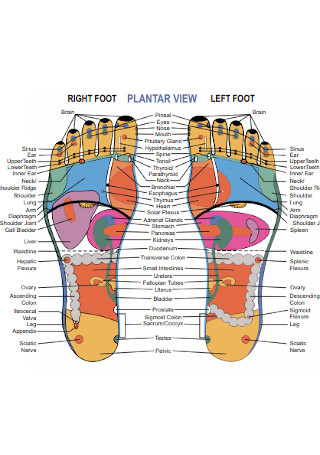
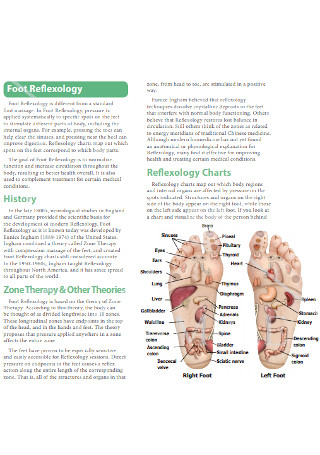
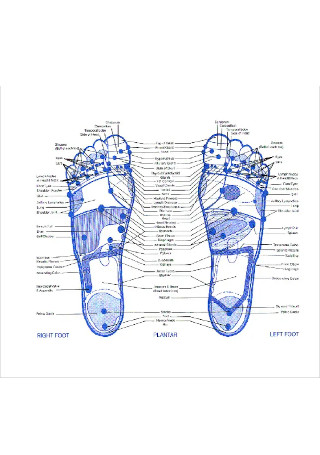
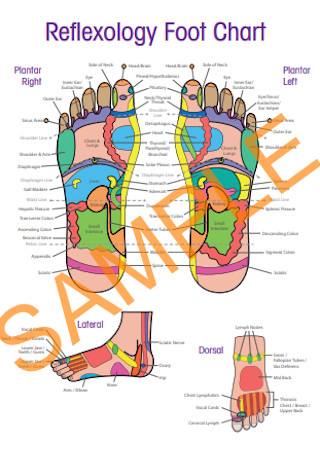
First of all, reflexology refers to a healing technique to treat your body by stimulating different pressure points. Foot reflexology is one branch of reflexology that focuses on pressuring your feet to heal other parts of the body; thus, keeping you in a relaxed state. Meanwhile, a foot reflexology chart is the official detailed chart used to help you identify where every pressure point of your foot is. The same goes for learning how each point will affect your body entirely. And this chart is presented with a diagram or graphical data along with labels for both the left foot and the right foot.
According to Fedhealth, there are around 7,000 nerve endings to your foot. And foot reflexology can target the right nerve endings that stimulate other areas of your body to treat stress, sickness, and more.
Also, it has been reported that reflexology and a massage are not the same. Reflexology targets pressure points that will help alleviate pain or illness while a massage is helpful solely for relaxing you and treating muscle aches.
Why Is a Foot Reflexology Chart Important?
Foot reflexology charts are important if you are still a beginner at being a foot reflexologist or you just want to familiarize the basic pressure points of the feet to improve your health. Since the chart is expected to display the different sections of the feet’ pressure points and their corresponding labels, then you can practice foot reflexology by basing on the chart’s data. Hence, it is better to have a detailed diagram or guide on how to be a proper reflexologist rather than assuming you already know reflexology but not exactly.
Also, foot reflexology does not simply benefit your feet. Those pressure points affect many other body parts from your hand, head, stomach, shoulder, back, neck, and more. Moreover, the process benefits many people from those in pregnancy, sickness, and other conditions. The same goes for benefiting your mental and emotional health rather than just focusing on physical health. And did you know that tension and stress are the leading causes of aggravating your health? Thankfully, foot reflexology slowly helps you alleviate that tiredness and strain at the end of the day, especially when there are over 7,000 never endings to your foot—which reflexology can target to hit the nerve endings to treat body areas.
What Are the Common Benefits of Foot Reflexology?
Before you create or follow a foot reflexology chart, it is crucial that you understand the benefits of foot reflexology first. Some of its well-known advantages might just be what your body needs at the moment. Hence, your drive to master foot reflexology will inspire you even more. So without further ado, here are the benefits expected from foot reflexology:
The Four Basic Areas of a Foot Reflexology Chart
A foot reflexology chart is often divided into four standard areas. It consists of the foot reflexology inside chart, outside chart, sole chart, and toe chart. So what exactly are they? Get to know more about the basic areas of foot reflexology charts below:
Inside Chart
The foot reflexology inside chart refers to the internal parts of the body, which is why it has the word ‘inside.’ Examples of internal organs you cannot see would be the spine, bladder, lymphatic system, sciatic nerve, and many more. And it is very important for the chart or document to specify which internal parts get affected, especially when you can’t see those organs.
Outside Chart
The opposite of the inside chart would be the foot reflexology outside chart. From the word itself, this section refers to the outside components of the body, meaning you can see them. And the common external parts affected here would be the chest, shoulders, knees, elbows, etc. Also, studies suggest using both inside and outside charts for a complete therapeutic experience.
Sole Chart
Starters can begin studying the foot reflexology sole chart. Also referred to as a sole map, this chart covers the body parts exactly as they are inside you. From the eyes, lungs, ears, teeth, and more, you can lessen the pain for specified portions. And its name is basically derived from the soles of your feet, making it relevant to foot reflexology as well.
Toe Chart
Lastly, you can use the foot reflexology toe chart or toe map. This example tackles meridian points of your toes from the big toe down to the last toe. Thus, you will be giving pressure on the toes to effectively heal, may it be to the liver, spleen, gall bladder, and more.
How to Make a Foot Reflexology Chart
You have just learned the basics of what a foot reflexology chart is, including its different areas and benefits. Now for the real question, are you ready to create your own foot reflexology chart? The process is easy, considering you no longer start from scratch. In fact, you can complete it shortly as you follow these six simple steps below:
Step 1: Determine Your Purpose and Type of Therapy
How sure are you that foot reflexology is the type of therapy you really need to master? Assess your purpose in the meantime. Maybe you prefer neck reflexology, nose reflexology, and more. Being sure of your purpose helps you know how to tailor your chart. So be sure it is really meant to be a foot reflexology chart if you are focusing on foot reflexology.
Step 2: Use a Sample Foot Reflexology Chart
What guarantees your experience to be an easy route is the sample templates provided above this article. You have plenty of sample foot reflexology charts to choose from. Just check out each example and choose your desired template to work with. More so, you can edit the sample according to however you want it. Finalize your preferred version, format, and design until you are satisfied with how your chart’s output should end up like.
Step 3: Add Pictures or Drawings of Feet
What is a chart without a set of pictures, diagrams, and figures? In the concept of foot reflexology, you are expected to insert pictures of the left foot and the right foot. It does not have to be very realistic or complex as long as the symbol or picture is clear. In fact, those figures of feet are not for art purposes only but for graphical data purposes. Since you are expected to display the pressure points of each foot, then foot figures are commonly found in the chart.
Step 4: Label Each Foot’s Pressure Points
Label every foot’s corresponding pressure points. This is the important detail of your chart so that audiences can see clearly where each pressure point is and how each point can affect the human body. You can use symbols towards each point while its meaning will be written below the picture so that longer explanations and details will fit the chart. Or perhaps, you add a blank to each point while you write the label to each blank. Ensure that you got the correct pressure points or the whole chart is wrong. In fact, the samples provided above will guide you on this step already as you observe the photos.
Step 5: Apply a Color-Coding Technique
A common approach to foot reflexology charts is to use color-coding systems. That means you just assign certain colors to each pressure point of the foot. Next, write the legends or what every color signifies below the chart. To prevent confusion, you can also provide pictures in different angles may it be from the feet’ plantar view, medial view, dorsal view, and lateral view. Also, ensure that the colors, symbols, figures, and words in the chart are in high resolution to avoid confusion.
Step 6: Place Clear Instructions
Most importantly, put clear and accurate instructions into the chart. Besides showing the graphical representation and labels of pressure points in foot reflexology, you also cannot forget the steps on how to conduct foot reflexology in the first place. Be direct and use easy language, especially if you will be sharing the form or chart with the general public. Maybe you add about the level of pain for each pressure point, what essential oil to use upon massaging, and other relevant instructions. Lastly, produce the chart when you are happy with the results.
FAQs
What are the two kinds of foot reflexology charts?
It is known that a foot reflexology chart has two kinds. One example divides the foot into four facets which are the head, pelvic, chest, and abdomen. The other kind divides the four facets into even more specific parts like the eyes, heart, stomach, etc. And the kind of chart you use depends on how detailed you want your chart to be.
Are reflexology and a massage the same thing?
Although both reflexology and a massage are somewhat similar, they are not entirely the same. Reflexology concerns pressure points to lessen pain or illness. Meanwhile, a massage is simply for relaxing and treating any muscle ache. Hence, reflexology will always be a massage but a massage will not always be reflexology.
What is another name for reflexology?
Reflexology is also referred to as zone therapy, which is a known complementary therapy that applies pressure to specific points of the body.
An important takeaway is that foot reflexology is not solely for treating medical conditions since it is more of an alternative treatment plan or therapy to help you experience benefits for the body. A calming and relaxing experience is what reflexology can promise you often. Also, some people might not be allowed for reflexology due to serious health conditions. Contacting a medical professional is a must before actually pursuing it. And once you receive the green signal to pursue it, don’t forget to be guided with a foot reflexology chart to manage it correctly.
